
Overview
ASA: 8.3+ (Written/Tested on 9.0)
Authentication: Local (Local ASA User Database)
Type: Split-tunnel OR Non split-tunnel
The below configurations will work with 8.3+, but was written and tested with 9.0. When setting up a Anyconnect VPN tunnel, you can push all traffic from the client over the VPN (Tunnel all) or you can use a split tunnel to only push traffic destined for selected subnets over the VPN tunnel. In laymen terms, the clients internet traffic originates from their ISP in a split tunnel, and it originates from the ASA when using tunnel all. The below configuration examples assume you have a basic setup equivalent to running factory-default and are setup to authenticate locally to the ASA. I will give examples of each configuration below.
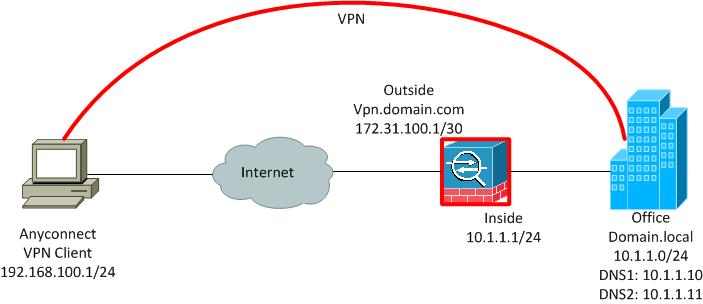
Network Diagram
The ASA has a command that gives an overview of how to configure an Anyconnect SSL VPN, which in global configuration mode is vpnsetup ssl-remote-access steps. Here are the results of that command:
ciscoasa(config)# vpnsetup ssl-remote-access steps

Steps to configure a remote access SSL VPN remote access connection and AnyConnect with examples:

1. Configure and enable interface

        interface GigabitEthernet0/0
         ip address 10.10.4.200 255.255.255.0
         nameif outside
         no shutdown

        interface GigabitEthernet0/1
         ip address 192.168.0.20 255.255.255.0
         nameif inside
         no shutdown

2. Enable WebVPN on the interface

        webvpn
         enable outside

3. Configure default route

        route outside 0.0.0.0 0.0.0.0 10.10.4.200

4. Configure AAA authentication and tunnel group

        tunnel-group DefaultWEBVPNGroup type remote-access
        tunnel-group DefaultWEBVPNGroup general-attributes
         authentication-server-group LOCAL

5. If using LOCAL database, add users to the Database

        username test password t3stP@ssw0rd
        username test attributes
         service-type remote-access

Proceed to configure AnyConnect VPN client:

6. Point the ASA to an AnyConnect image

        webvpn
         svc image anyconnect-win-2.1.0148-k9.pkg

7. enable AnyConnect

        svc enable

8. Add an address pool to assign an ip address to the AnyConnect client

        ip local pool client-pool 192.168.1.1-192.168.1.254 mask 255.255.255.0

9. Configure group policy

        group-policy DfltGrpPolicy internal
        group-policy DfltGrpPolicy attributes
         vpn-tunnel-protocol svc webvpn
There are a few important things to note from Cisco’s directions:
- They are using the default names for configuring the group policy and tunnel groups, which will throw a warning that they already exist since they’re defaults
- The directions do not specify that you MUST attach the VPN Address pool to the tunnel group, which is necessary for it to work!
- They do not include how to create a split tunnel or a tunnel all to allow internet from the Anyconnect client.
- They are using outdated “svc” commands, which were replaced with “anyconnect”.
With that said, let’s move on to the configurations!
Anyconnect Configuration 1: Tunnel All
!Enable WebVPN, Set Anyconnect Image, and Enable Anyconnect
config t
webvpn
enable outside
tunnel-group-list enable
anyconnect image disk0:/anyconnect-win-3.1.05178-k9.pkg 1
anyconnect image disk0:/anyconnect-macosx-i386-3.1.05178-k9.pkg 2
anyconnect image disk0:/anyconnect-linux-3.1.05178-k9.pkg 3
anyconnect enable
end
!Create DHCP Pool for Anyconnect Clients
config t
ip local pool pool-anyconnect 192.168.100.1-192.168.100.254 mask 255.255.255.0
end
!Create Group Policy for Anyconnect
config t
group-policy GroupPolicy_Anyconnect internal
group-policy GroupPolicy_Anyconnect attributes
vpn-tunnel-protocol ssl-client
end
!Create Tunnel Group for Anyconnect
config t
tunnel-group TunnelGroup_Anyconnect type remote-access
tunnel-group TunnelGroup_Anyconnect general-attributes
authentication-server-group LOCAL
default-group-policy GroupPolicy_Anyconnect
address-pool pool-anyconnect
tunnel-group TunnelGroup_Anyconnect webvpn-attributes
group-alias 1-Admin enable
end
!Create NAT Exemption and Enable Outside Traffic to Enter/Exit the Same Interface
config t
object-group network obj-anyconnect
network-object 192.168.100.0 255.255.255.0
exit
nat (outside,outside) after-auto source dynamic obj-anyconnect interface
same-security-traffic permit intra-interface
end
!Tunnel All Traffic Over Anyconnect VPN and Force Use of DNS Servers
config t
group-policy GroupPolicy_Anyconnect attributes
split-tunnel-policy tunnelall
split-tunnel-all-dns enable
end
!(OPTIONAL)Create Local User for Anyconnect
config t
username user1 password P@SSWORD
username user1 attributes
service-type remote-access
end
!(OPTIONAL) Add DNS Settings for Anyconnect Client
config t
group-policy GroupPolicy_Anyconnect attributes
dns-server value 10.1.1.10 10.1.1.11
default-domain value domain.local
end
!(OPTIONAL) Allow Anyconnect IP Pool to Manage ASA
config t
ssh 192.168.100.0 255.255.255.0 inside
http 192.168.100.0 255.255.255.0 inside
management-access inside
end
!(OPTIONAL)Auto launch anyconnect
config t
group-policy GroupPolicy_Anyconnect attributes
webvpn
anyconnect ask none default anyconnect
end
Anyconnect Configuration 2: Split Tunnel
!Enable WebVPN, Set Anyconnect Image, and Enable Anyconnect
config t
webvpn
enable outside
tunnel-group-list enable
anyconnect image disk0:/anyconnect-win-3.1.05178-k9.pkg 1
anyconnect image disk0:/anyconnect-macosx-i386-3.1.05178-k9.pkg 2
anyconnect image disk0:/anyconnect-linux-3.1.05178-k9.pkg 3
anyconnect enable
end
!Create DHCP Pool for Anyconnect Clients
config t
ip local pool pool-anyconnect 192.168.100.1-192.168.100.254 mask 255.255.255.0
end
!Create Group Policy for Anyconnect
config t
group-policy GroupPolicy_Anyconnect internal
group-policy GroupPolicy_Anyconnect attributes
vpn-tunnel-protocol ssl-client
end
!Create Tunnel Group for Anyconnect
config t
tunnel-group TunnelGroup_Anyconnect type remote-access
tunnel-group TunnelGroup_Anyconnect general-attributes
authentication-server-group LOCAL
default-group-policy GroupPolicy_Anyconnect
address-pool pool-anyconnect
tunnel-group TunnelGroup_Anyconnect webvpn-attributes
group-alias 1-Admin enable
end
!Create NAT Exemption
config t
object-group network obj-anyconnect
network-object 192.168.100.0 255.255.255.0
exit
nat (inside,outside) 2 source static any any destination static obj-anyconnect obj-anyconnect no-proxy-arp route-lookup
end
!Create Split Tunnel, Allow Access to VPN and Inside Subnets, and Apply to Group Policy
config t
access-list ACL_split-tunnel standard permit 192.168.100.0 255.255.255.0
access-list ACL_split-tunnel standard permit 10.1.1.0 255.255.255.0
group-policy GroupPolicy_Anyconnect attributes
split-tunnel-policy tunnelspecified
split-tunnel-network value ACL_split-tunnel
end
!(OPTIONAL)Create Local User for Anyconnect
config t
username user1 password P@SSWORD
username user1 attributes
service-type remote-access
end
!(OPTIONAL) Add DNS Settings for Anyconnect Client
config t
group-policy GroupPolicy_Anyconnect attributes
dns-server value 10.1.1.10 10.1.1.11
default-domain value domain.local
end
!(OPTIONAL) Allow Anyconnect IP Pool to Manage ASA
config t
ssh 192.168.100.0 255.255.255.0 inside
http 192.168.100.0 255.255.255.0 inside
management-access inside
end
!(OPTIONAL)Auto launch anyconnect
config t
group-policy GroupPolicy_Anyconnect attributes
webvpn
anyconnect ask none default anyconnect
end
Testing the Configuration
Open a web browser, connect to your ASA (https://vpn.domain.com OR https://172.31.100.1), and you’ll be prompted to login. You can login with the user account you’ve created in the configuration above. The Anyconnect client will automatically install, if it fails you may need to download and manually install it. Once installed, you can connect to your ASA by the outside interface (vpn.domain.com OR 172.31.100.1) and authenticate with the user you’ve created.
Additional Notes
You may wish to use a 3rd party SSL certificates (ie: Verisign, Thawte, Godaddy, etc) so end users do not get prompted about certificate warnings. Cisco ASA’s will regenerate it’s certificate upon reboot, and due to this you should create a self signed certificate whenever you cannot use a 3rd party. You can create the self signed certificate as follows:
!Create Self Signed Certificate
config t
crypto ca trustpoint SELF
enroll
enrollment self
fqdn vpn.domain.com
subject cn=vpn.domain.com,dc=domain,dc=com
exit
crypto ca enroll SELF
!The following warnings will generate, answer accordingly as below:
!
!WARNING: The certificate enrollment is configured with an fqdn
!that differs from the system fqdn. If this certificate will be
!used for VPN authentication this may cause connection problems.
!
!Would you like to continue with this enrollment? [yes/no]: yes
!
!The fully-qualified domain name in the certificate will be: vpn.domain.com
!
!Include the device serial number in the subject name? [yes/no]: no
!
!Generate Self-Signed Certificate? [yes/no]: yes
!
!Attach the certificate to the outside interface
ssl trust-point SELF outside
end
1 comments
Best article I’ve seen in configuring SSL VPN using command line. Thanks for this post!