
This is the updated article specifically for the RetroPie on the RaspberryPi 4 with the Retroflag NESPi 4 Case. This will support up to most systems up until Playstation 1 (PS1). If you’re interested in RetroPie on the RaspberryPi 3/3B+, you can refer to my original article but please note this one has some additional information that still applies.
Hardware Used
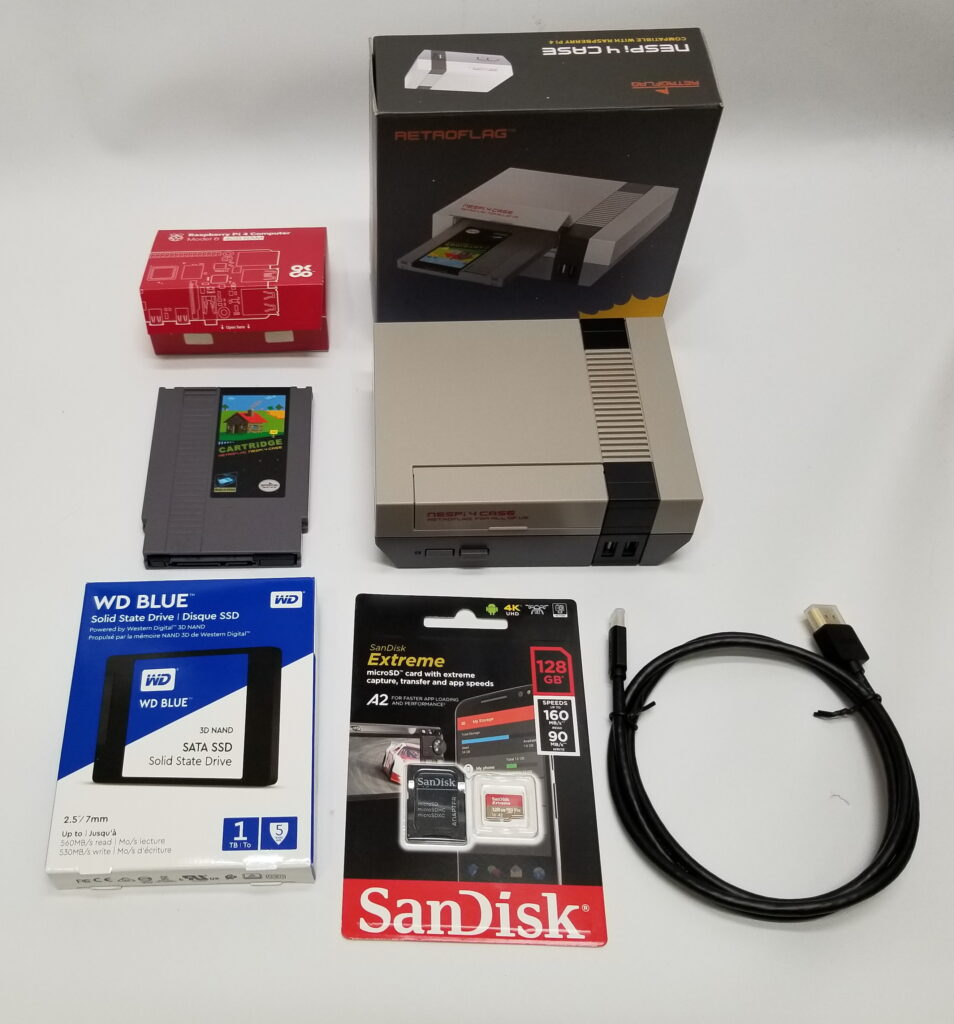
Here is the hardware and pricing on my build. You can lessen the cost by using existing hardware or replacing it with cheaper items. The important items are the Raspberry Pi 4B & RetroFlag NESPi 4 Case.
- RaspberryPi 4 Model B 4GB RAM
- $59 on Amazon
- Note: No need to get 8GB as it does not affect game performance
- SanDisk 128GB Extreme microSDXC UHS-I Memory Card
- $24.88 on Amazon
- Note: You can go much smaller if you plan to store ROMs on a SSD such as an 8GB card for about $8
- RetroFlag NESPi 4 Case
- $39.99 on Amazon
- Exact replicate of NES, functioning power & reset buttons, removable USB 3.0 SSD HDD, and all cables moved to the back now. Retroflag makes cases for other
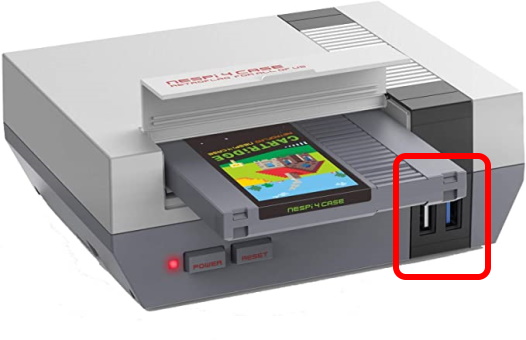
- IMPORTANT NOTE: There are 2 versions of this case and the original version has issues with 2.4GHz wireless and Bluetooth when using the USB 3.0 Ports due to improper shielding!!!
- Version 2 (RECOMMENDED): You can identify this version because it has 2 x white USB 2.0 ports on the front of the case! The changes on this case fix the 2.4GHz wireless and more importantly the Bluetooth issues!
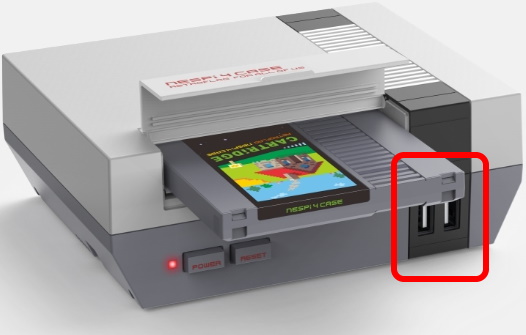
- Version 1 (NOT RECOMMENDED): You identify this version because it has 1 x white USB 2.0 and 1 x blue USB 3.0 port on the front of the case! If you use USB wired controllers and wired ethernet, this will not be an issue and you can use the SSD on USB 3.0. If you use 2.4GHz Wireless or Bluetooth, DO NOT USE THIS CASE! The only known workarounds are to plug the SSD into the USB 2.0 port and disconnect the USB 3.0 ports (which means the front USB ports won’t work) or shield the USB cables (I’ve heard/saw mixed results)
- Optional: Western Digital 1TB WD Blue 3D NAND Internal PC SSD
- $104.99 on Amazon
- Although optional, I would recommend this to store the ROMs as USB 3.0 gives better performance for an SSD vs. the microSD card and more longevity
- Optional: 2 x 8Bitdo Sn30 Pro+ Bluetooth Gamepad
- $49.99 each on Amazon
- Note: You can use an existing PS/XBox controller or a much cheaper USB controller.
- Optional: Rii mini i8+ Keyboard
- $19.95 on Amazon
- Note: You can use an existing USB or USB Wireless keyboard
Software Used
Resources
- RetroPie Install Guide
- Update/Backup RetroPie
- Supported RetroPie Emulators
- Skyscraper
- Setup 8Bitdo Bluetooth Controller
- Check MD5 Hash on a File In Windows (Useful to verify BIOS Hashes)
- certutil -hashfile c:\folder\bios.bin MD5
- Note: Replace MD5 with the MD5 hash of the file
- Run ROMs from a USB Drive
- Clean No-Intro 2018 ROM set
Update 8Bitdo Controller Firmware
- Download the latest 8Bitdo Controller Firmware on a Windows Computer
- Run the update utility and follow the onscreen instructions
Create RetroPie SD Card
- Download RetroPie imager/installer for the appropriate version of your Raspberry Pi on a Windows Computer
- Connect the MicroSD card to your Windows Computer
- Open the downloaded Raspberry Pi Imager software
- It will automatically select the Operating System for downloaded version of RetroPi
- Select your MicroSD card as the Storage device
- Click Write to write RetroPi to the MicroSD card
Install the RaspberryPi Into the Case
- Make sure the case is powered off
- Install the RaspberryPi into the Retroflag case as per the directions
- Switch the Safe Shutdown switch to ON
- Connect the Micro HDMI cable, Ethernet Cable, keyboard USB dongle, insert the microSD card, and insert the USB-C power cable
- NOTE: Do NOT mount the SSD Into the Cartridge Case yet, we will need to format it as exFat or FAT32 on a PC using directions later in this article!
Configure US Keyboard on First Boot
- Make sure the keyboard dongle is connected and the keyboard is charged and powered on
- Turn the power to “ON” on the case
- On the Welcome Screen, hold any button on the keyboard to configure it, and configure it as follows:
- D-PAD UP: Up Arrow
- D-PAD DOWN: Down Arrow
- D-PAD LEFT: Left Arrow
- D-PAD RIGHT: Right Arrow
- START: 1
- SELECT: 2
- Button A / East: Enter (Same as OK key)
- Button B /South: Escape
- For all other keys, hold any button to skip configuring
- When OK is highlighted, press the Enter button
- When prompted about not enabling a hotkey button, highlight YES and press Enter to use the default select button
- Navigate to the RetroPie menu and press Enter on the keyboard
- Select RASPI-CONFIG and press Enter on the keyboard
- Select Localization Options and press Enter on the keyboard
- Select Change Keyboard Layout and press Enter on the keyboard
- Select Generic 105-key (Intl) PC and press Enter on the keyboard
- For the keyboard layout, select Other and press Enter on the keyboard
- Select English (US) and press Enter on the keyboard
- Select English (US) and press Enter on the keyboard
- Select Default Keyboard Layout and press Enter on the keyboard
- Select No Composer Key and press Enter on the keyboard
- Select Finish and press Enter on the keyboard
- Select RASPI-CONFIG and press Enter on the keyboard
Optional – Connect WiFi (Skip if using Wired LAN)
- Navigate to the RetroPie menu and press Enter on the keyboard
- Select RASPI-CONFIG and press Enter on the keyboard
- Select Localization Options and press Enter on the keyboard
- Select Change WI-FI Country and press Enter on the keyboard
- Select United States and press Enter on the keyboard
- Press OK on the success message
- Select Finish and press Enter on the keyboard
- *Select WIFI and press OK on the keyboard
- Select Connect to WIFI network and press Enter on the keyboard
- Select the SSID, and press Enter on the keyboard
- Enter the SSID PSIK and press Enter on the keyboard
- Select Exit and press Enter on the keyboard
Optional – Enable SSH (Useful later for scraping ROMs)
- Navigate to the RetroPie menu and press Enter on the keyboard
- Select RASPI-CONFIG and press Enter on the keyboard
- Select Interface Options and press Enter on the keyboard
- Select SSH and press Enter on the keyboard
- Select Yes to enable SSH and press Enter on the keyboard
- Press OK to confirm SSH is enabled
- Select Finish and press Enter on the keyboard
Optional – Update RetroPie
- Navigate to the RetroPie menu and press Enter on the keyboard
- Select RETROPIE SETUP and press Enter on the keyboard
- Select Update and press Enter on the keyboard
- When prompted, select Yes and press Enter on the keyboard
- Press OK/YES to all proceeding messages
- Select Exit and press Enter on the keyboard
- If Retropie Does Not Boot Emulation Station and is stuck asking for the retropie login
- Login as pi
- Navigate to the RetroPie menu and press Enter on the keyboard
- Select RASPI-CONFIG and press Enter on the keyboard
- Select Boot Options and press Enter on the keyboard
- Select Desktop/CLI and press Enter on the keyboard
- Select Console Autologin and press Enter on the keyboard
- Select Finish and press Enter on the keyboard
- Select Yes to reboot and press Enter on the keyboard
- It should not restart and autologin to emulationstation again
Add the RetoFlag Safe Shutdown Script for Power/Reset Buttons
I personally recommend using crcerror’s forked version of the retroflag script vs. the official retroflag version of the script for the power/reset buttons. Here are the differences and instructions to install either:
- crcerror Script
- Button Functions:
- Press Reset in Emulator: Exits emulator back to Emulationstation
- Press Reset in Emulationstation: Restarts Emulationstation
- Press Reset in Console: Restart the RaspberryPi
- Press Power in Console, Emulationstation, or ROM Emulator: Shutdown the RaspberryPi
- Install Directions:
- Ensure you are connected to the internet & the keyboard is connected
- Press F4 to enter the terminal
- In the terminal, type the one-line command below (Case Sensitive):
- wget -O – “https://raw.githubusercontent.com/crcerror/retroflag-picase/master/install.sh” | sudo bash
- RetroPie will restart once complete
- Button Functions:
- Retroflag Script
- Button Functions:
- Press Reset in Emulator/Emulationstation: Restart the RaspberryPi
- Press Reset in Console: Nothing
- Press Power in Emulator/Emulationstation: Shutdown the RaspberryPi
- Press Power in Console: Nothing
- Install Directions:
- Ensure you are connected to the internet & the keyboard is connected
- Press F4 to enter the terminal
- In the terminal, type the one-line command below (Case Sensitive):
- wget -O – “https://raw.githubusercontent.com/RetroFlag/retroflag-picase/master/install.sh” | sudo bash
- RetroPie will restart once complete
- Button Functions:
Setup Bluetooth Controllers
This is written for the 8Bitdo controllers, but should be the same for any Bluetooth controller
- Navigate to the RetroPie menu and press Enter on the keyboard
- Select BLUETOOTH and press Enter on the keyboard
- Make sure 8Bitdo mapping hack is set to off
- Power on the 8Bitdo controller by holding the start button until the blue light comes on. Once it is blinking, set it to pairing mode by holding the select button for 3 seconds and the blue light will start rapidly blinking
- Select Register and Connect Bluetooth Device and press Enter on the keyboard
- The controller will show up with its MAC address as 8Bitdo, select it and press Enter on the keyboard
- Select DisplayYesNo and press Enter on the keyboard
- Repeat for each additional controller
- Select Setup udev rule for joypad and press Enter on the keyboard
- Select an 8Bitdo controller and press Enter on the keyboard
- Press Enter on the keyboard to confirm the entry was added
- Repeat for each additional controller
- Select Cancel and press Enter on the keyboard to return to Emulationstation
- Press 1 on the keyboard to bring up the Main Menu
- Select Configure Input and press Enter on the keyboard
- When prompted to configure input, press Enter on the keyboard
- Hold any key on the 8Bitdo SNES30 controller and configure it as follows
- D-PAD UP: Up Arrow
- D-PAD DOWN: Down Arrow
- D-PAD LEFT: Left Arrow
- D-PAD RIGHT: Right Arrow
- START: Start
- SELECT: Select
- A: A
- B: B
- X: X
- Y: Y
- LEFT SHOULDER: L
- RIGHT SHOULDER: R
- For all others, hold any button to skip configuration (Or use the keyboard to skip down to OK)
- When OK is highlighted, press the Enter on the keyboard
- When prompted about not enabling a hotkey button, highlight YES and press Enter on the keyboard to use the default select button
- Repeat for each Controller
- Press 1 on the keyboard to bring up the Main Menu
- Select Quit and press Enter on the keyboard
- Select Restart System and press Enter on the keyboard
- Select Yes to confirm the restart and press Enter on the keyboard
Install Optional Emulators
| System | OPT Emulator | Note |
| Apple II | linapple | |
| Atari ST | hatari | |
| Commodor 64 | vice | |
| Coleco Vision | lr-blueMSX | coolcv not supported on Pi4 due to video drivers at this time, using lr-blueMSX instead |
| Dragon 32 / Tandy CoCo | xroar | |
| Intellivision | lr-freeintv | |
| MSX | lr-fmsx | Adds the following files to BIOS folder: CARTS.SHA, CYRILLIC.FNT, DISK.ROM, FMPAC.ROM, FMPAC16.ROM, ITALIC.FNT, KANJI.ROM, MSX.ROM, MSX2.ROM, MSX2EXT.ROM, MSX2P.ROM, MSX2PEXT.ROM, MSXDOS2.ROM, PAINTER.ROM, RS232.ROM |
| Virtual Boy | lr-beetle-vb | |
| Wonderswan / Wonderswan Color | lr-beetle-wswan | |
| Zmachine | frotz | Includes Zork 1, 2, and 3 |
- Navigate to RetroPie menu and press Enter on the keyboard
- Select RETROPIE SETUP and press Enter on the keyboard
- Select Manage packages and press enter on the keyboard
- Select Manage Optional packages and press enter on the keyboard
- Select %EMULATOR_NAME% and press enter on the keyboard
- Select Install from source (latest) or Install from binary and press Enter on the keyboard and wait for the installer to finish
- Select Back and press Enter on the keyboard
- Optionally, repeat the process to install more emulators or to Exit
- Select Back and press Enter on the keyboard
- Select Back and press Enter on the keyboard
- Select Exit and press Enter on the keyboard
Install Experimental Emulators
| System | Exp Emulator | Note |
| Nintendo DS | drastic | |
| Atari Jaguar | lr-virtualjaguar | Does not run great on PI4 still, reports that lr-mess works well |
- Navigate to RetroPie menu and press Enter on the keyboard
- Select RETROPIE SETUP and press Enter on the keyboard
- Select Manage packages and press enter on the keyboard
- Select Manage Experimental packages and press enter on the keyboard
- Select %EMULATOR_NAME% and press enter on the keyboard
- Select Install from source (latest) or Install from binary and press Enter on the keyboard and wait for the installer to finish
- Select Back and press Enter on the keyboard
- Optionally, repeat the process to install more emulators or to Exit
- Select Back and press Enter on the keyboard
- Select Back and press Enter on the keyboard
- Select Exit and press Enter on the keyboard
Add BIOS and Config Files to the SD Card
- From a Windows computer containing the BIOS and Config Files, open the samba share for the RetroPie by entering \\retropie
- If this does not work, navigate to the RetroPie menu, press Enter on the keyboard, select Show IP, press OK on the keyboard and note the IP then press Enter on the keyboard
- Try to access the samba share for the RetroPie by using the IP address noted above: \\IPADDRESS
- Copy the BIOS files to the BIOS Share
- OPTIONAL – Copy Configs to the CONFIGS share
- You only need to do this if you have previous configurations backed up & do not want to treat this as a brand new install
Prepare the SSD and Copy ROMS
Note: See my article on cleaning ROM collections:
https://sigkillit.com/2019/06/19/clean-no-intro-2018-rom-set/
- Plug the SSD into a Linux or Windows PC and format the SSD drive as exFAT or FAT32
- Create a folder called retropie-mount on the root of the drive
- Mount the SSD drive into the RetroFlag “Cartridge” case
- Install the cartridge into the RetroFlag case and ensure the SSD firmly inserts into the connector and then power on the RetroPie
- It will proceed to automatically copy the Retropie folder and all of its content (You may need to reboot to start the copy)
- From a Windows computer containing the ROM Files, open the samba share for the RetroPie by entering \\retropie
- If this does not work, navigate to the RetroPie menu, press Enter on the keyboard, select Show IP, press OK on the keyboard and note the IP then press Enter on the keyboard
- Try to access the samba share for the RetroPie by using the IP address noted above: \\IPADDRESS
- Copy your ROMs to the ROMS share
Special Configurations for ROMs to Work Properly
Atari 800 / Atari 5200 Load BIOS
- Launch an Atari 800/5200 game
- If you launched a 5200 game, select Standard 5200 cartridge option or if you launched a 800 game you won’t see this prompt just continue. You’ll get a warning that you need a real Atari/OS.
- Press F1 on the keyboard to open the menu
- Select Emulator Configuration and press enter on the keyboard
- Select System ROM Settings and press enter on the keyboard
- Select Find ROM images in a directory, navigate to the BIOS directory (/home/pi/RetroPie/BIOS) and press the space bar on the keyboard to select that directory.
- Press Escape on the keyboard to go back a menu
- Select Save Configuration File and press enter on the keyboard
- Select Save Configuration on Exit and press enter on the keyboard
- Press Escape on the keyboard to go back a menu
- Select Exit Emulator and press enter on the keyboard
- If you have the correctly named BIOS files and it should automatically configure them
Atari 5200 Auto Load Game (Prevents Memo Pad from Loading)
If the screen loads to a blue memo pad instead of loading the game, this is because it’s set to an 800 system. You can press F1 and load the rom file each time or you can do the following to override it
- Launch the Atari 5200 game
- Using a controller (not keyboard), Press the Select + X (Hotkey + X) to bring up the Quick Menu
- Select Options and press enter on the keyboard
- Select Atari System and press the right arrow to select 5200
- Press B to return to the previous menu
- Select Resume and press A to return to the game
- Test to see if it works now. If it works, you can permanently save it by going back to Controls and selecting Save Core Overrides
Atari 800 / Atari 5200 Configure Controller
UPDATE: Detects “RetroPad” controllers as of version lr-atari800 version 1.9.7
Launch Atari 800/5200 gamePress the Select + X (Hotkey + X) to bring up the Quick MenuSelect Controls and press ANext to user 1 Device Type, press the right arrow to select Atari JoystickPress B to return to the previous menuSelect Resume and press A to return to the gameTest to see if it works now. If it works, you can permanently save it by going back to Controls and selecting Save Core Overrides
Sinclair ZX Spectrum
Not all games will work with a joystick! However, if the input does not seem to be working
- Launch a ZX Spectrum game
- Press the Select + X (Hotkey + X) to bring up the Quick Menu
- Select Controls and press A
- Next to user 1 Device Type, press the right arrow to select Kempton Joystick or Cursor Joystick
- Press B to return to the previous menu
- Select Resume and press A to return to the game
- Test to see if it works now. If it works, you can permanently save it by going back to Controls and selecting Save Core Overrides
Install Skyscraper
NOTE: See my article on cleaning ROM collections:
https://sigkillit.com/2019/06/19/clean-no-intro-2018-rom-set/
- Press F4 on the keyboard to exit emulationstation and enter the terminal
- Enter the following command at the terminal:
- sudo ~/RetroPie-Setup/retropie_setup.sh
- Select Manage Packages and press Enter on the keyboard
- Select Optional Packages and press Enter on the keyboard
- Select Skyscraper and press Enter on the keyboard
- Select Install from pre-built biner or Install from source and press Enter on the keyboard
- Select Back and press Enter on the keyboard (Repeat 3x’s)
- Select Exit and press Enter on the keyboard
- Optional – Add Login for screenscraper.fr, enter the following command at the terminal:
- sudo nano /opt/retropie/config/all/skyscraper/config.ini
- Add the below lines
- [screenscraper]
- userCreds=”USER:PASSWORD”
- Replace USER with your username and PASSWORD with your password
- Press Ctrl + O then press Enter on the keyboard to save the file
- Press Ctrl + X to exit
- Type emulationstation and press Enter to go back to emulationstation
Scrape ROMs with Skyscraper
Scrape All Game Data
- Press F4 on the keyboard to exit emulationstation and enter the terminal
- Note: once you exit emulationstation, you can SSH into the PI so you can use your TV while you wait for the ROM scrapes to occur which take hours to days. The default username is pi and password is raspberry
- Enter the following command at the terminal:
- sudo ~/RetroPie-Setup/retropie_setup.sh
- Select Manage Packages and press Enter on the keyboard
- Select Optional Packages and press Enter on the keyboard
- Select Skyscraper and press Enter on the keyboard
- Select Configuration/Options and press Enter on the keyboard
- Select Gather Source and press Enter on the keyboard
- Choose the source, I recommend using ScreenScraper and TheGamesDB. SkyScraper will use both sources to give you the most complete data
- Select Gather Resources and press Enter on the keyboard
- Select the game system you want to scrape (suggest 1 at a time as it takes a few hours & the sources will limit the # of scrapes in a time limit) and press Enter on the keyboard
- Note: This caches the game info & images in \\retropie\configs\all\skyscraper\ and only needs run once unless you add new games. It then uses this cache to build the game info, which greatly increases the speed since it all local. However, you will need to monitor the size of the cache to make sure it does not fill the SD card.
- Select Generate Games Lists and press Enter on the keyboard
- Select the game system(s) you want to scrape and press Enter on the keyboard
- Note: This builds the game images, description, etc
- Select Run on all systems and press Enter on the keyboard then WAIT!
Fix Incorrect or Missing Scrape Data From ScreenScraper
I found what I consider to be errors or missing game data for some Games on the ScreenScraper DB or GameFAQs (Use it as a parent DB to add new Games) and submitted proposals to correct them or add data. However, some of my requests were denied. I’ve created custom fixes you can download here and the rest of the info will be pulled from TheGamesDB or Screenscraper as an additional source.
- Download the zip file here
- Unzip to file to \\retropie\configs\all\skyscraper\import\
- You will need to Gather Resources and select Import as the Source
Here’s a complete list of the corrections I made:
- coleco
- Super Action Soccer (USA, Europe) – Named the game “Super Action Football (soccer)” which causes potential duplicates with “Super Action Football” since the root names match and the brackets should be reserved for info such as region. My suggestion was denied to rename the game to something without brackets such as “Super Action Football aka Soccer” or “Super Action Football ‘Soccer'”. My fix overrides the Title and forces it to use TheGamesDB as the data source for the rest of the game instead of Screenscraper.
- gb
- 4 in 1 (Europe) (4B-001, Sachen-Commin) (Unl)
- 4 in 1 (Europe) (4B-002, Sachen) (Unl)
- 4 in 1 (Europe) (4B-004, Sachen-Commin) (Unl)
- 4 in 1 (Europe) (4B-005, Sachen-Commin) (Unl)
- 4 in 1 (Europe) (4B-006, Sachen) (Unl)
- 4 in 1 (Europe) (4B-007, Sachen) (Unl)
- 4 in 1 (Europe) (4B-008, Sachen) (Unl)
- 4 in 1 (Europe) (4B-009, Sachen) (Unl)
- 4 in 1 (Taiwan) (En,Zh) (4B-003, Sachen-Commin) (Unl)
- All of the above games scrape as “4-in-1 Fun Pak” instead of the proper “4 in 1” Sachen games. I tried submitting them as new games but was denied because Wikipedia was not a good enough source (https://en.wikipedia.org/wiki/Thin_Chen_Enterprise). My fix includes generic images and game info.
- gba
- 2 Games in 1 – Scooby-Doo + Scooby-Doo 2 – Monsters Unleashed (USA)
- 2 in 1 – Asterix & Obelix – Bash Them All! + Asterix & Obelix XXL (Europe) (En,Fr,De,Es,It,Nl)
- 2-in-1 Fun Pack – Shrek 2 + Madagascar (USA)
- Donkey Kong (USA) (Advance Play Edition)
- Double Game! – Golden Nugget Casino & Texas Hold ’em Poker (Europe)
- Golf (USA) (Advance Play Edition)
- Harry Potter Collection (Europe) (En,Fr,De,Es,It,Nl,Pt,Sv,No,Da)
- Hugo 2 in 1 (Europe) (En,Fr,De,Es,It,Nl,Pt,Sv,No,Da,Fi,Pl)
- Kaisertal – Fight the Necronis War (Europe) (Demo)
- Pinball (USA) (Advance Play Edition)
- Soccer (USA) (Advance Play Edition)
- Tennis (USA) (Advance Play Edition)
- Winnie the Pooh’s Rumbly Tumbly Adventure & Rayman 3 (Europe) (En,Fr,De,Es,It,Nl+En,Fr,De,Es,It,Nl,Sv,No,Da,Fi)
- Yoshi’s Cookie (USA) (Advance Play Edition)
- My requests to add descriptions on the above were denied because any source with info was not good enough. My fix includes a description for these games.
- gbc
- Jurassic Boy II + Thunder Blast Man (World) (1B-002, 1B-003, Sachen) (Unl)
- Space Invasion & Karate Joe (Europe) (Unl)
- Space Invasion & Painter (Europe) (Unl)
- Space Invasion (Europe) (Unl)
- My requests to add descriptions on the above were denied because any source with info was not good enough. My fix includes a description for these games.
- snes
- PowerFest 94 – Ken Griffey Jr. Presents Major League Baseball (USA)
- PowerFest 94 – Super Mario Bros. – The Lost Levels (USA)
- PowerFest 94 – Super Mario Kart (USA)
- There is no separate game for the PowerFest 94 versions and it scrapes under the original game. My recommendation was denied because they consider it the same game with a timer. My fix overrides the Title and forces it to use TheGamesDB as the data source for the rest of the game instead of Screenscraper.
1 comments
1 pings
This is the best guide I have found for the NESPi case, thank you very much!
[…] https://sigkillit.com/2020/09/09/retropie-install-guide-raspberrypi-4/ […]