If you have ever worked with VMWare’s vSphere, I’m sure there has come a time that you needed to modify or remove Windows VM Disk. Sure, it’s a simple enough task, but what if you have multiple disks that are the same size? How can you correctly identify the virtual disk in vSphere? Luckily, it is quite easy to identify a virtual disk in a Windows VM.
Identify the Bus and Target ID in the Windows VM
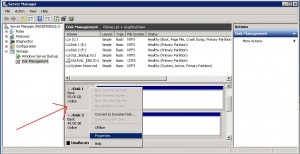
On your Windows VM, open Server Manager. In Server Manager, Expand Storage and click on Disk Management. Right Click on a Disk and click Properties (Note: Make sure you right click on the left side where it says Disk #, don’t right-click on the right side where it has the partition).
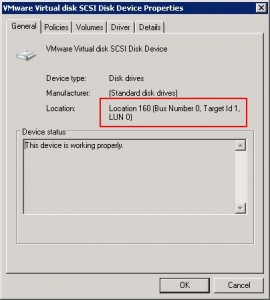
On the General Tab, locate the Bus # and Target Id and record the values for each disk.
Identify the Windows Disk in vSphere
In vSphere, open the properties of your virtual machine. If you select a virtual disk, the SCSI or IDE Controller and ID is displayed under Virtual Device Node. Using this information, you can match it to the Windows Disk. The SCSI/IDE Controller # will match the Bus # and the SCSI/IDE ID will match the Target Id. Ex: Bus 0, Target Id 1 in Windows matches SCSI(0:1) in vSphere.


4 comments
Skip to comment form
This isn’t always true. If you have a disk on SCSI 1:0 for instance it might not show up properly using your matching method…IE in my case vmware disk SCSI 1:0 shows in windows as Bus 0, Target ID 0, Lun 0. It’s best to compare the “Location” with the scsi port slot number in the vmx file for the disk.
What´s a confusing and really bad article – it is not true!!! Bus nr is definitelly not always SCSI nr.
What I do to make sure is resize the disk to a unique size (i.e. add an extra 10 GB). Then a do a disk rescan and check if the disk I modified in VMware is the same as the disk in the OS.
If you’re on a large team where you don’t have access to the VMX files, but need to be sure which drive is which, if you’ve got view access to vSphere, what I do is go to the Monitor tab -> Performance -> Advanced -> Virtual Disks -> Chart Options, remove everything selected & choose Average Read Requests per Second & Average Write Requests per Second for all the drives. Then I fire up Crystal DiskMark, set it to 5 passes of at least 4GB, select the drive I think I’m looking for, & start the test. Hop back over to vSphere & watch which one goes through the roof on the chart. Bonus, you get a storage throughput test out of it.
Disclaimer: Use on production systems is at your own discretion, but if it’s a system like a DB that needs high throughput you will impact performance during the test.